Empowerment Maps Generic Tool Steps
Steps for an Empowerment Leadership Map

STEP 1 empowerment Vision: how will i look if i am empowered and happy?
- Think first how you are now. Are you happy or sad, confident or frightened, healthy or sick, educated or not, never had the opportunity to attend school, what work do you do?
- Then think about people you admire. What are their characteristics?
- Finally think how will you be as ‘the ideal you’ – the future you who brings about positive change for your self and those around you.
Draw yourself as the ‘ideal you’: the powerful spider at the centre of the relationship web you will build. Draw in pencil so you can change at the end if you wish. Take your time. And put the date at the top.
STEP 2 Which People and Institutions are Important in my Life?
The next step on your individual leadership webs draw around you the different people and institutions who are ‘important’ in your life; working outwards from the centre, putting those who are most important closest to you. Make sure you draw people in different colours, shapes, sizes, characteristic objects etc so you can recognise them later.
Include any groups you are a member of eg savings groups, religious groups, ‘important people’ are not necessarily only your immediate household or even the wider family. It could include eg banks, or even the president.
STEP 3: Growing the Web and Building Networks for Change
For these people/institutions:
- Ring in red any who are already part of your network
- Ring in green any who are likely to be sympathetic but who you need bring into your web. Put a very thick ring around those who may be most powerful in support.
- Ring in blue any who are likely to oppose your vision. Put a very thick ring around those who are most powerful in opposition. These are people you can either leave, or persuade through working with others.
- Put arrows between people and institutions who are linked – differentiate the type and strength of the linkage through colour and thick/thin line and direction.
- Put a very thick green circle around the main entry points as key targets for a change strategy.
STEP 4: Action priorities
Then put very thick green circles around about 5 targets and think concretely about:
- what will you do? eg will you share any of the tools? lobby or provide other information? put people in contact with others?
- what will be the timeframe? at least one activity for each target within one month, however small, and other strategies over a longer time if necessary.

Step 5 Track, update and continue
Review progress on the maps at both both individual and collective levels – turning green elements red. Identifying new targets and actions in green.
And feel free to make the ‘new empowered you’ in the centre of the web even more beautiful. And appreciate the strength and reach of your web.
At the bottom right you can also put a symbol for how you felt before to think how far you have come.
Logo and songs
Allocate some time for adding elements from the empowerment web to the song and logo design process.
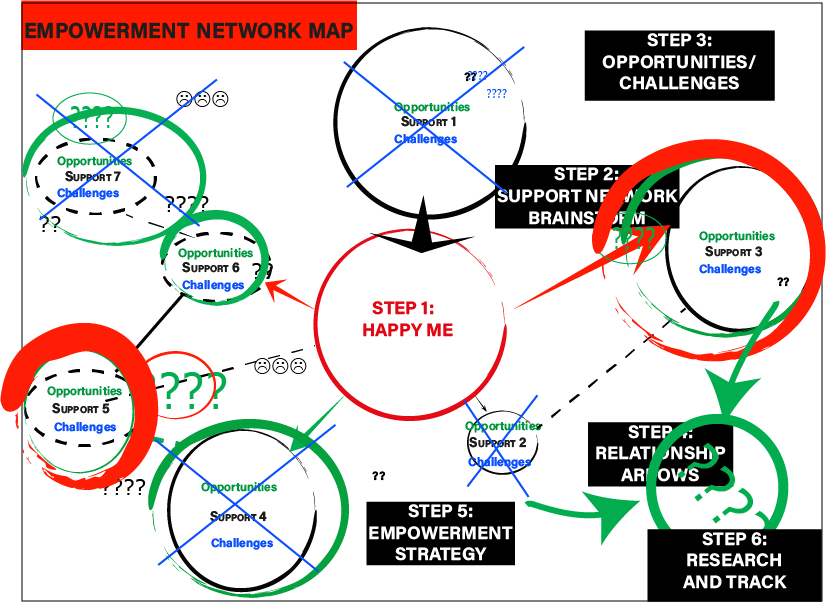
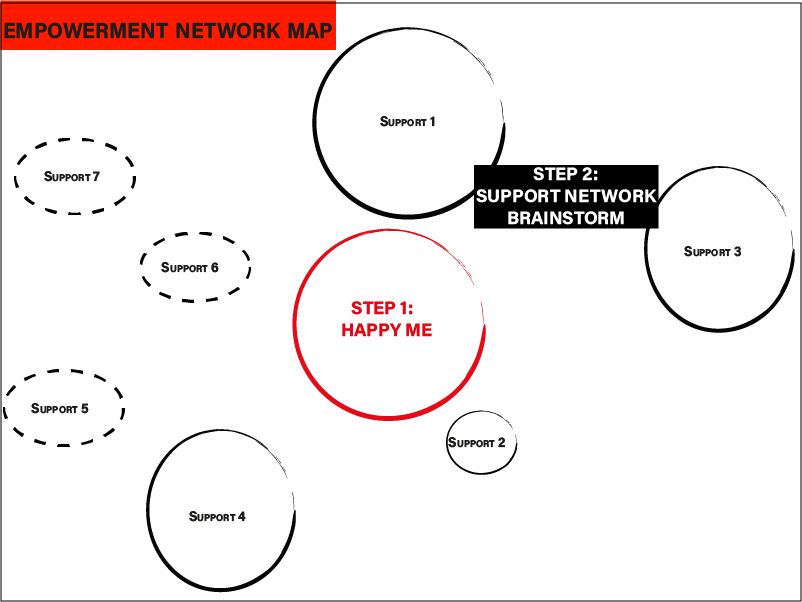
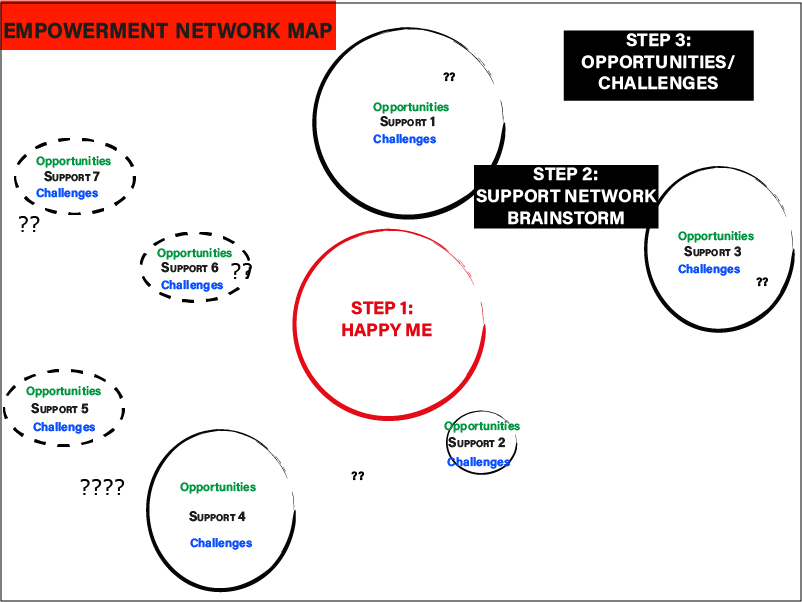
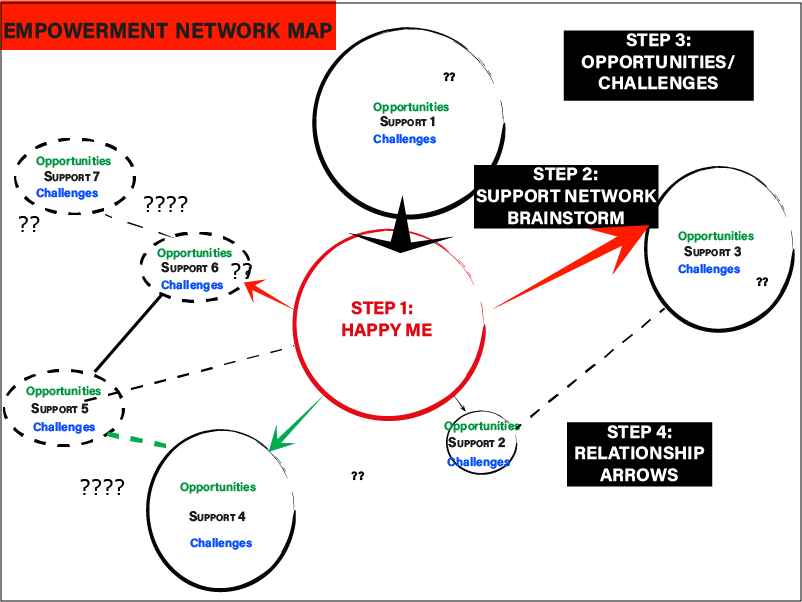
empowerment map: Tool Steps
STEP 1 EMPOWERMENT VISION:
How will I look if I am free from violence, empowered and happy?
Think first how you are now. Are you happy or sad? are you a survivor/victim of violence from some people? are you a perpetrator of violence towards other people?
How will you be as ‘the ideal you’ – the future you who is free from violence and does not commit violence against others?
Draw that ideal person in the centre of the diagram – that ideal is at the centre of the empowerment web you will build.
Step 2 PEOPLE AND INSTITUTIONS THAT CAN SUPPORT ME
to free myself from violence
violence against me or violence that I myself commit. Work outwards from the centre, putting the people and institutions who are most important closest to you. Make sure you draw people in different colours, shapes, sizes, characteristic objects etc so you can recognise them later. Include any groups you are a member of eg savings groups, religious groups, ‘important people’ are not necessarily only your immediate household or even the wider family. It could include eg banks, or even the president. You can also use different types of line to indicate how important or powerful these people are. Inside each circle put symbols for the different opportunities or challenges that each presents in your fight against violence.
Step 3
Step 4 RELATIONSHIP ARROWS:
STEP 4: For these people/institutions:
Ring in red any who are already part of your support network
Ring in green any who are likely to be sympathetic but who you need bring into your support network. Put a very thick ring around those who may be most powerful in support.
Ring in blue any who are likely to oppose your vision. Put a very thick ring around those who are most powerful in opposition. These are people you can either leave, or persuade through working with others.
Put arrows between people and institutions who are linked – differentiate the type and strength of the linkage through colour and thick/thin line and direction.
Put a very thick green circle around the main entry points as key targets for a change strategy.
Step 5 STEP 5: ACTION PRIORITIES:
Then put very thick green circles around about 5 targets and think concretely about:
what will you do? eg will you share any of the tools? lobby or provide other information? put people in contact with others?
what will be the timeframe? at least one activity for each target within one month, however small, and other strategies over a longer time if necessary.